As an Amazon Associate I earn from qualifying purchases. This doesn't cost you anything, and I only recommend products that I totally love!
Outdoor Pallet Coffee Table with Planter and Icebox
By the time spring rolls around each year, I am completely ready to trade out my boots and jackets for flip flops and tank tops. I always get so excited to see the trees start to bloom and fresh flowers start peeking through the thawing garden beds. This spring has felt extra special for me because we are settling in to our new home, which has a large and deep front porch. This porch was probably the biggest highlights for me as we were comparing houses – there were so many possibilities!

Outdoor Living Space!!
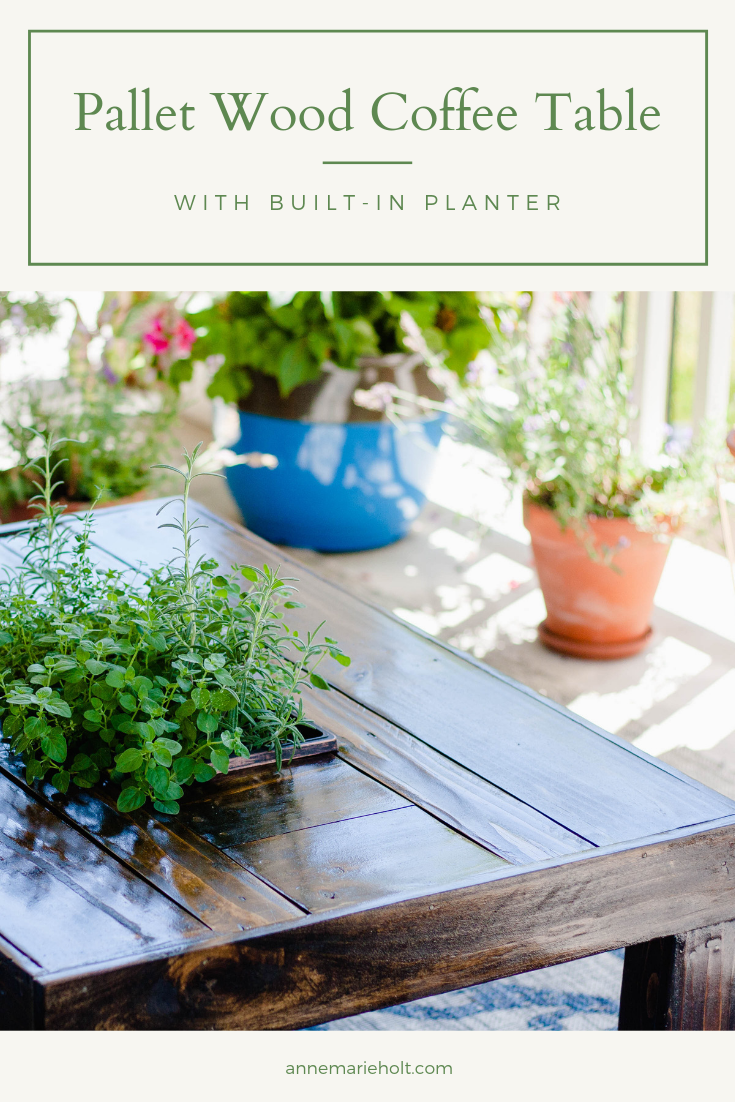
Now that the weather is warm, I’ve been busy designing a relaxing seating area outside to relax and entertain in throughout the nice weather. While I’ve built all the wood furniture out here, I am most proud of this pallet coffee table that features an herb planter, which can be pulled out and replaced with a tub filled with ice to keep wine or beer chilled on those warm afternoons and evenings.
The porch is very spacious and feels like a whole extra room in our house, but the best part is that we can even see the sunset right from our seats! It is so nice to have friends and family over and not have to worry about running back inside to put the bottle of wine in the fridge to keep it from getting warm. I can sit and enjoy the view and the company without having to move! I’ve gotten so many compliments and questions about this pallet wood coffee table, as well as requests for me to build more. I’m thrilled others love the coffee table also, so I am going to share the basic process I followed to build it.

A few notes:
I built the surface of the table out of old pallet wood from a friend. (This is the same friend who introduced me to the kreg jig tool I used to build my family room coffee table in this post!) I needed to build a sturdy frame underneath the surface though, because the pallet wood, while beautiful, was not as strong as I’d like. I also did not follow a particular plan – I made it up as I went, however, I drew some inspiration and tips, such as to build a frame first, from some other bloggers who made similar tables. The second table I made was done very similarly to the first one, but it went much smoother, since I knew what I was doing that time.

If you are trying to make a coffee table like this, using pallet wood, keep in mind that not all pallet wood is created equal. Some planks are thicker than others, some are stronger than others, and the width and length of planks can vary a lot as well. I based the size of my table off the size of the loveseat it sits in front of. Generally speaking, a coffee table should be about ⅔ the length of the sofa it is paired with. The surface of the table should be level with the height of the seat cushion. I followed this guideline as closely as I could, given the constraints of the quality of the wood I had.
Materials I used:
Wood for your surface – I used old pallet wood, but you can use other kinds, such as 1 inch thick planks.
Wood for your frame – I used 2x4s and 2x6s that I already had at home.
Tools I used:
–Kreg Right Angle Clamp – I love it, it is awesome
–Drill and drill bits – I used this drill
–Miter saw – I used this miter saw but you can probably get away with a circular saw if you can cut in straight lines pretty well
Equipment:
safety goggles (even though its nerdy, I prefer goggles over glasses – less chance of particles getting in your eyes. I often work with glass so goggles are a must, but wood particles can be dangerous too!)
–Respirator Mask (go for the heavy duty one – there’s all kinds of gunk trapped in the wood, and you don’t know what kind of stuff might have been stacked on those pallets before they made their way to you)
Pencil

Making the Coffee Table:

1) Begin by sanding your planks. Start with 60-80 grit, then move to 120-150, and finish with about 220 grit sandpaper. Always sand with the grain of the wood. This is tedious but it is so much easier to do all this work when the planks are flat. It isn’t fun to fight to sand in all the nooks and crannies once you’re done building.
2) Determine the length of your table and build the frame for the surface, leaving room for the planter. You need to also account for how you’re going to mount the wood to fill in on the sides of your planter to make it flush on all four sides. For my first table, I only used a 2×4 to support the planter on the shorter sides, so I needed to mount an extra board to mount the surface planks to. On my second table, I used a 2×6, in the middle of where the two shorter planks were inserted.


3) Cut and mount your pallet planks to the surface of your table frame by screwing through the bottom of the frame, into the bottom of the planks, making sure not to let the screw come through the top of the table. The planter box I used had a little lip that sits on top of the pallet plank surface, so I built the frame to match the width of the box, using two long planks the length of the table, and shorter pieces of the planks to fill in the shorter sides to make the edges flush all around. Notice the two long planks on each side that run the length of the table, and then the two shorter pieces on either shorter side that are mounted inside to fill out the table?

4) Mount 2×4 legs to the frame of your table, using brackets or a pocket hole jig/drill set.

5) Cut planks to trim out an apron that will sit flush with the surface of the table and mount to your frame. I used finishing nails for this.

6) Cut planks that are the length of the exposed 2×4 leg and mount to the legs. I used finishing nails and wood glue.

7) Fill in any small gaps with a paintable/stainable wood filler and let it dry.

8) Sand the filler and any rough edges left over from your cuts or drilling. Stain or paint as you choose. I used Minwax Dark Walnut and sealed it with Hemsman Spar Urathane by Minwax to protect it from the elements.
When you’re finished:
I planted herbs in the planter that is usually in the table, since I love herbs, and am trying to plant mostly plants that spiders and mosquitos don’t want to hang out in. The whole porch is really taking on a Mediterranean vibe, with all the blue, terracotta, and herbs. Whenever I want to switch out the planter with the empty one I’ve filled with ice, I simply reach under the table, push the box up a bit, and pull it out. I know this planter coffee table will continue to be a useful focal point for many years to come. The only thing I love more than seeing the reaction that people have when they see it is being able to use the table while they visit. It makes relaxing on the porch during sunset even more enjoyable now that I don’t have to constantly run into the house to get something from the fridge.
I hope you enjoyed this and that the information is helpful! I’d love to hear what you think. Send me a picture if you make one of your own. Happy building!
Amazon and the Amazon logo are trademarks of Amazon.com, Inc, or its affiliates.